First of all, make sure you know which motherboard
you have. The M560 has a different BIOS to the M560TG.
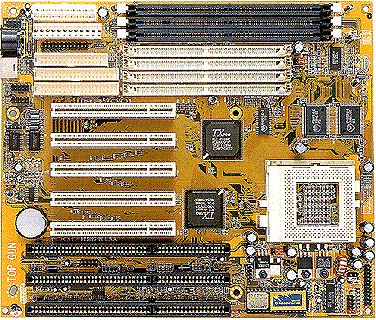
Click on the pictures for more info on these boards.
This is the M560
This is the M560TG

M560 3.1 Manual
M560TG
Manual
M560 4.1 Manual
(Same as M565)
These manuals are in PDF format
so you'll need Adobe
Acrobat Reader.
For those of you who are unsure as to what motherboard
you've got, just count the PCI slots (the white ones).
The M560 has 4 slots while the M560TG has 5.
--------------------------------------------------
Once
you know which motherboard you've got,
click
on the links below to download the right BIOS.
The last official releases are in white.
--------------------------------------------------
For
the M560 v3.1 & v4.1
5600210s.zip - M560 BIOS - 02/10/1998 S
This was the last GUI based BIOS release.
5600410s.zip
- M560 BIOS - 04/10/1998 S
This was the last official release for the M560.
5601108s.zip - M560 (BETA) BIOS - 11/08/1998 S
As far as I know, this BETA BIOS is officially from PC-CHIPS
but for some reason (only known to them) it was
never released out to the general public.
I've been using the 5601108s since 02/19/2002 and
have had no trouble with it, however, if you're game to
give it a go, remember that you do so at your own risk.
Click here for more
info on
the 5601108s BETA
--------------------------------------------------
For the M560TG
(M565)
5650214s.zip - M560TG BIOS - 02/14/1998 S
5650410s.zip - M560TG BIOS - 04/10/1998 S
5650624s.zip
- M560TG
BIOS - 06/24/1998 S
This was the last official release
for the M560TG.
5650723s.zip - M560TG (BETA) BIOS - 07/23/2001
S
This BIOS is basically a modified version of the 5650624s.
It's been modified to support the K6-2/K6-2+/K6-III/K6-III+
CPU's for those who decided to perform the hardware hack to
their motherboard to supply lower voltages (under 2.5V) than
provided by the onboard voltage regulators. This is also the
BIOS to use when buying the socket 7 adaptor which provides
the lower voltages required by the mentioned CPU's.
Be aware that this BIOS must be considered unofficial.
The risk involved in using it will be solely up to you.
--------------------------------------------------
These programs are needed as well:
AMIFLASH.zip
- AMINF332 BIOS Flashing Program
CLRCMOS.zip - Clears CMOS data before flashing
BIOS
(NOTE: CLRCMOS will be reported as a virus because
of its ability to clear your BIOS CMOS data)
--------------------------------------------------
Unzip the files and copy them to a BOOTABLE floppy.
The floppy should contain the following:
AMIFLASH.EXE - Flash Program
CLRCMOS.EXE - Clears CMOS Data
NEWBIOS.ROM - Your new BIOS ROM file
NOTE: Rename the new BIOS file to NEWBIOS.ROM
(It makes it easier to explain and to follow)
Leave the floppy in A: and RESTART
your system.
As it's starting up, press <DEL> to get into your
BIOS SET-UP screen. Go into ADVANCED CMOS SETUP and
make sure that all system caches are turned off or disabled.
"SYSTEM BIOS CACHEABLE" must be disabled for this
update. If not, then the flash may not work properly and
you could end up permanently damaging your board.
Once that's done, SAVE & EXIT to RESTART your system.
When you see the A:\ prompt come up, type in:
AMIFLASH /sAMIBOOT.ROM
<ENTER>
NOTE: Type in EXACTLY as shown. DO NOT CHANGE!!!
This makes a backup of your current BIOS (just in case).
Once that's done, type in:
CLRCMOS
<ENTER>
AMIFLASH NEWBIOS.ROM <ENTER>
This will first do a BIOS check to make sure that
you're flashing the right BIOS version. If all is well
and you get no errors, the program will continue.
The only error I got during the flash was:
ERROR 9: BIOS TAG IS INCORRECT
OLD BIOS TAG IS <001_10_TX_PRO>
NEW BIOS TAG IS <001_10_>
PRESS <ENTER> to CONTINUE OR <ESC> TO EXIT
If you see this message and you're absolutely sure
that you've got the right BIOS file, just press <ENTER>
to start flashing your BIOS (takes about a minute).
When it's finished,
your system will RESET itself and
you should then see the new BIOS version come up.
Adjust all your new BIOS settings and you're done.
If your previous BIOS was the GUI version
(e.g. with icons) then say good-bye to it.
It's now a standard menu driven BIOS.
That's all there is to it. Good luck!!!
--------------------------------------------------
EMERGENCY BIOS FIX
If you stuff up first time like I did, don't panic.
There is a quick and easy solution (and it works).
Insert the floppy that's got your BIOS back-up on it
and turn OFF your system for at least 10 seconds.
When you turn it back ON, press CTRL & HOME.
You should hear the floppy start to read.
If not, turn OFF and try again.
This forces the motherboard into doing a BIOS fix.
It looks for a file called AMIBOOT.ROM on the floppy
and then automatically restores the BIOS for you.
When you hear four beeps (takes about a minute),
the job is done. Eject the floppy and your system should
RESET itself. It should then come up with your original BIOS.
Just adjust all
your BIOS settings and you're done.
That's why the backup is so important.
--------------------------------------------------
FOR THE EXPERIENCED ONLY
You can also flash your BIOS this way for new updates.
Just rename the new BIOS file to AMIBOOT.ROM and
follow the same instructions as above but make sure that
you use a different floppy for each BIOS version you use.
Don't overwrite your original BIOS, you may need it!!!
P.S. Mark each floppy correctly.
Don't mix them up like I did.
--------------------------------------------------
Hopefully everything goes well for you.
Good luck and all the best
mick3048